


Location: Florence Rd corridor, Stanwood, WA 98292
Call Date: April 20, 2026
First Visit: April 21, 2026
Project Completion: April 28, 2026
Lead Technician: Robert, 7 years of experience, Mitsubishi Advance certified
System Before: 2024 Mitsubishi multi-zone system, model MXZ-3C30NA, equipment healthy but installed poorly across four indoor units, an unsecured wall bracket, uninsulated refrigerant lines, a kinked lineset, and a condensate line actively leaking inside a wall
System After: All four zones repaired: bracket re-anchored, lines insulated, kink straightened, condensate leak resolved, coil and blower wheel deep cleaned
Final Project Cost: $2,707.83 ($2,481.97 before tax, after military discount)
Meghan didn’t call Product Air because anything seemed wrong. Her house on Florence Rd in Stanwood was barely a year old, the Mitsubishi ductless system inside it was just as new, and as far as she knew, everything was working exactly the way it was supposed to. She called for yearly maintenance, the kind of appointment homeowners book precisely because nothing has gone wrong yet, and they’d like to keep it that way. “They didn’t know about it,” is how the visit later got described, and that single detail turns out to be the whole story.
Does a New Home Still Need Yearly HVAC Maintenance?
Meghan found Product Air through the company’s Marysville Google Business Profile, and this was her first call, a new customer with no history with the company and no reason to suspect her not-quite-one-year-old system needed anything beyond a routine check. It’s an easy assumption to make. New construction, new equipment, no complaints: surely there’s nothing to find.
That assumption is exactly what a yearly maintenance visit exists to test, and Meghan’s case is about as clear an argument for it as any homeowner could ask for. A system can be functioning correctly by every measure a homeowner can observe, running when it’s supposed to, cooling and heating the rooms it’s assigned to, while quietly hiding installation defects that only surface during a hands-on inspection behind the equipment itself. Nothing about Meghan’s day-to-day experience with her system would have told her anything was wrong. Only a technician actually pulling units off the wall found out otherwise.
Can a Brand-New HVAC System Still Have Installation Problems?
Yes, and Meghan’s home is a direct answer to that question. Robert arrived for the maintenance visit on April 21. Seven years of experience, Mitsubishi Advance certified, credentials that put him in a position to recognize the difference between equipment that’s aging normally and equipment that was simply never installed correctly to begin with. The system itself, a 2024 Mitsubishi multi-zone unit, model MXZ-3C30NA, serving four indoor zones throughout the house, was working well. Robert’s assessment was blunt about where the actual problem lived: the equipment was fine. The installation was very poor.
Four Rooms, Four Defects: What Poor Ductless Mini Split Installation Actually Looks Like
What Robert found wasn’t one isolated mistake. It was a pattern repeated, with variations, across four separate rooms of the house, each one a different symptom of the same underlying issue: an installation crew that had cut corners on details invisible to a homeowner but critical to how the system holds up over time.
In the living room, the indoor unit’s coil and blower wheel needed a deep clean, dirt and debris built up enough to affect airflow and cooling efficiency. In the master bedroom, Robert found the wall bracket hadn’t been properly secured with adequate anchors: the indoor unit was, in practical terms, at risk of coming loose from the wall, the kind of defect that produces vibration noise long before it becomes an outright failure. Behind that same unit, the refrigerant lines had no insulation at all, which meant they were dripping water directly onto the wall whenever the system ran in cooling mode.
In the baby’s room, the defect went further. The unit had been mounted with its lines running into the wall completely uninsulated, which meant condensate wasn’t just dripping externally. It was draining directly inside the wall cavity itself, with nothing to catch it or direct it anywhere safe. The same lineset had a kink in it as well, restricting refrigerant flow, something Robert worked to straighten out by hand with a wrench once the unit was off the wall. And in the guest room, the lineset running through the closet was uninsulated too, sending condensate pouring down the closet wall every time the system cooled.
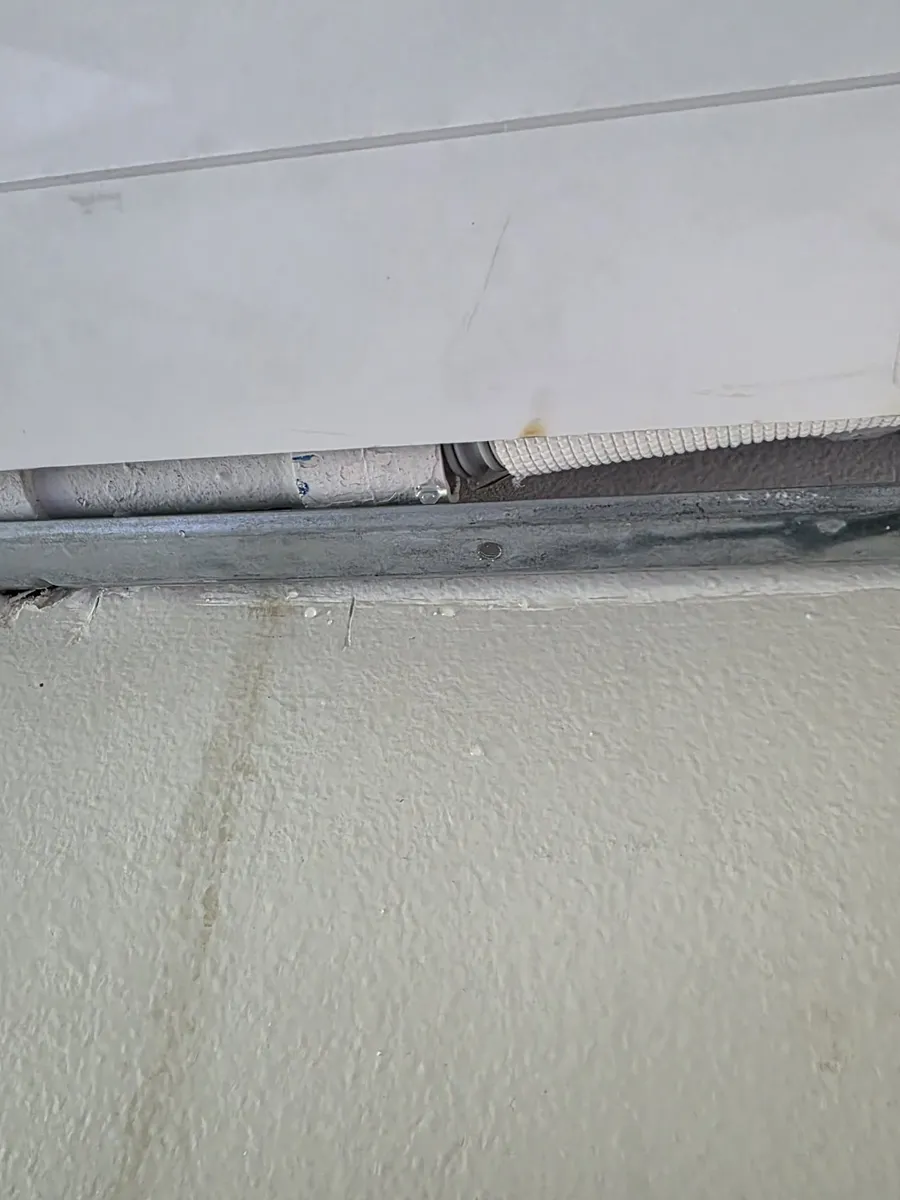
Four rooms. Four distinct versions of the same problem: an installation that looked complete on the surface and fell short in exactly the places a homeowner would never think to check.
Why Is My Mini Split Dripping Water Inside the Wall?
The mechanism behind Meghan’s situation is straightforward once it’s explained, and it’s a useful thing for any ductless mini split owner to understand. Refrigerant lines running in cooling mode carry cold refrigerant, and when those lines aren’t wrapped in proper closed-cell foam insulation, ambient moisture in the surrounding air condenses directly on the cold pipe surface, the same way a cold glass sweats on a humid day. Insulation exists specifically to contain that condensation and direct it safely away from anything it could damage. Without it, the water simply runs wherever gravity takes it.
In three of Meghan’s four zones, that meant water running down interior walls or, in the baby’s room, draining directly into the wall cavity itself, with nowhere for the moisture to go and no way for anyone to notice until the damage was already visible, typically as mold or rot, well after the point where a simple repair could have prevented it. That’s precisely the risk Robert’s diagnostic caught before it had the chance to develop: mold and rot, flagged as the safety concern in a home not yet a year old.
The Fix: Repair Every Zone, Not Just the One That Failed
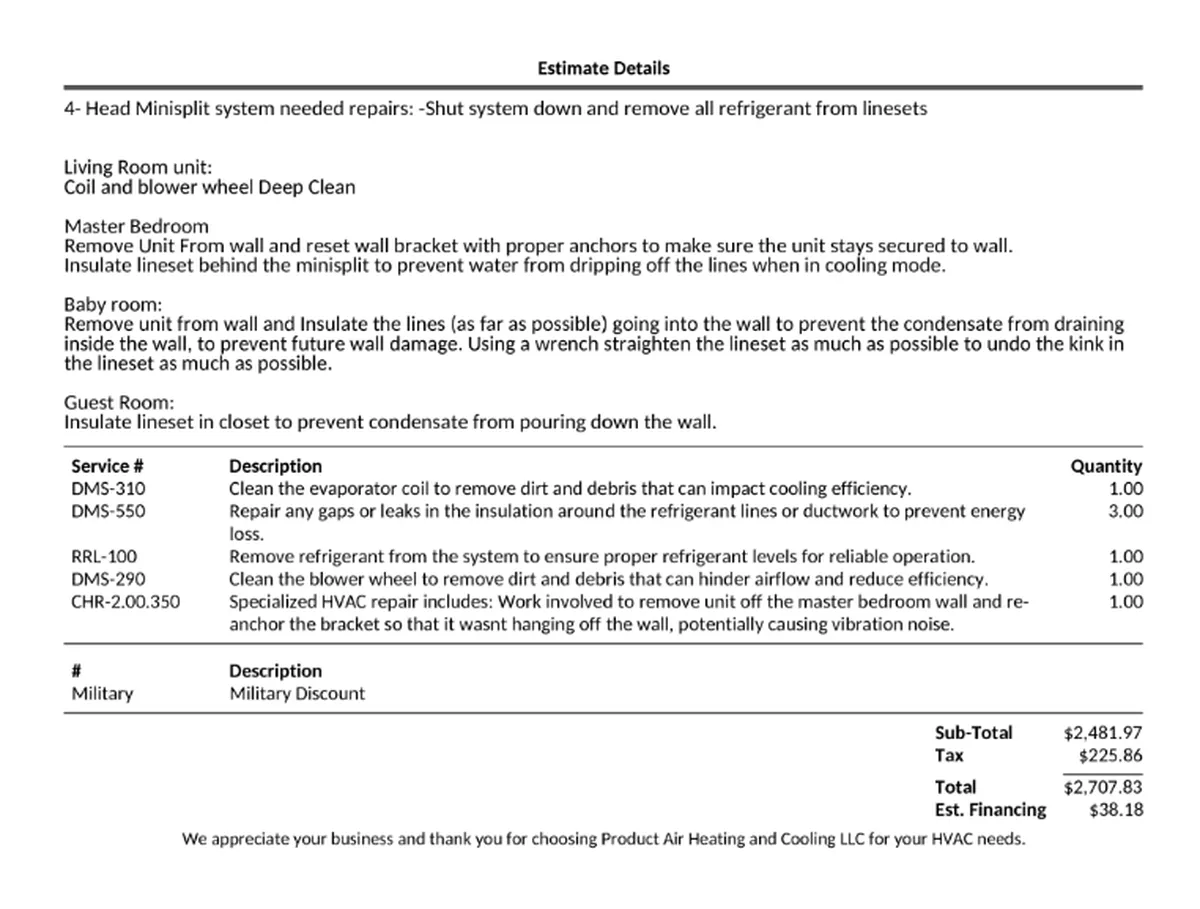
Robert didn’t recommend patching the most obviously damaged unit and leaving the rest for a future visit. With four separate defects identified across four rooms, the plan addressed all of them in a single coordinated repair: deep clean the living room unit’s coil and blower wheel, remove and re-anchor the master bedroom unit with proper wall anchors, insulate the exposed lineset behind it, remove the baby room unit to insulate its lines and straighten the kink, and insulate the guest room closet’s lineset to stop the condensate running down the wall there.
Robert didn’t just describe the problems verbally. “Showed pictures of what’s going on and explained what’s needed,” is how the explanation to Meghan was handled since every one of these defects was hidden behind wall-mounted equipment, photos were the only way she could actually see what he’d found before agreeing to the repair.
What Robert Actually Did to Stop the Damage
The repair began with shutting the system down and removing all refrigerant from the linesets before any of the indoor units could be safely pulled off their walls. From there, the work matched the diagnosis room by room: the living room coil and blower wheel were cleaned to remove the dirt and debris affecting airflow. The master bedroom unit was removed, and its wall bracket was reset with proper anchors so the unit was securely fastened rather than at risk of hanging loose, with the exposed lineset behind it insulated to stop the condensation dripping in cooling mode. The baby room unit was removed, its lines insulated as far into the wall as physically possible to prevent any further condensate from draining into the cavity, and the kinked lineset straightened by hand to restore proper refrigerant flow. The guest room closet’s lineset was insulated to stop the water running down that wall as well.
| Zone | Issue Found | Repair Performed |
| Living Room | Dirty coil and blower wheel | Deep cleaned to restore airflow and efficiency |
| Master Bedroom | Unsecured wall bracket, uninsulated lineset | Bracket re-anchored, lineset insulated |
| Baby Room | Condensate draining into wall, kinked lineset | Lines insulated into wall, kink straightened |
| Guest Room | Uninsulated closet lineset | Lineset insulated to stop condensate running down wall |
Once every zone was addressed, the result was simple: no leaks, anywhere, across a system that had been quietly compromised in four places since the day it was installed.
A Six-Hour Return Trip: How the Repair Came Together
The maintenance visit that uncovered the problem happened on April 21. The actual repair work was completed on a return trip on April 28, with one service technician on-site for six hours to work through all four zones’ worth of corrections in a single visit.
The Real Number: $2,707.83, With a Military Discount Applied
| Line Item | Amount |
| Clean evaporator coil | Included |
| Repair gaps/leaks in refrigerant line insulation (3 locations) | Included |
| Remove refrigerant from system | Included |
| Clean blower wheel | Included |
| Specialized repair: remove and re-anchor master bedroom wall bracket | Included |
| Military Discount | Applied |
| Sub-Total | $2,481.97 |
| Tax | $225.86 |
| Total | $2,707.83 |
No rebate programs applied, since this was repair work rather than an equipment upgrade. Rebates are structured around new, efficient installations, not fixing defects in equipment that already exists. Meghan paid the total by credit card, with 0% financing available as an option had she wanted to spread the cost, at an estimated $38.18 per month.
What Catching This Early Actually Saved Meghan’s Home
There’s a version of this story that ends very differently, one where nobody catches the uninsulated lines and the kinked lineset until a wall actually shows visible water staining, or worse, until mold has already established itself inside a cavity that’s nearly impossible to fully remediate without opening the wall. Meghan’s case didn’t go that far, precisely because a routine, no-complaints maintenance visit happened to be scheduled before any of that had the chance to develop. That’s the actual value of yearly maintenance on a system, even a brand-new one: it’s not there to catch problems you already know about. It’s there to catch the ones you don’t.
Meghan’s reaction after the repair reflected exactly that. She was pleased that the technician did a thorough job and found something like this, not frustration at an unexpected repair bill, but genuine relief that a defect she had no way of detecting on her own had been caught and corrected before it became a much larger problem in her family’s home.
Frequently Asked Questions: Ductless Mini Split Maintenance and Repair in Washington State
Can a brand-new HVAC system still have installation problems?
Yes. Equipment age and installation quality are two separate things, and a system can be less than a year old, functioning correctly on its own terms, and still be hiding significant installation defects introduced when it was originally put in. In a Stanwood case, a 2024 Mitsubishi multi-zone system was found to be working well mechanically, but the installation itself included an unsecured wall bracket, uninsulated refrigerant lines, and a kinked lineset across four separate rooms, all defects present from day one, not the result of age or wear.
Why is my mini split dripping water inside the wall?
This typically happens when the refrigerant lines running through or near a wall cavity aren’t properly wrapped in insulation. Cold refrigerant lines cause ambient moisture in the air to condense directly on the pipe surface, and without insulation to contain and direct that condensation safely away, the water runs wherever gravity takes it, sometimes straight into a wall cavity. In a Stanwood case, uninsulated lines behind three separate indoor units were found dripping condensate onto walls and, in one room, directly inside the wall itself.
Does a new home still need yearly HVAC maintenance?
Yes, and a recent case illustrates exactly why. A homeowner in a home built in 2024 called for routine yearly maintenance with no known complaints, and the visit uncovered four separate installation defects across four rooms, an unsecured wall bracket, uninsulated refrigerant lines, and a kinked lineset, all invisible to the homeowner without a hands-on inspection. New equipment doesn’t guarantee a defect-free installation, and yearly maintenance is often the only way hidden issues like these get caught before they cause visible damage.
What are signs of poor ductless mini split installation?
Common signs include a wall-mounted unit that vibrates or feels loose, water stains or dripping near an indoor unit, visible kinks in refrigerant lines, and gaps in the insulation wrapping those lines where they’re exposed or entering a wall. Many of these issues aren’t visible without removing the unit from the wall, which is why they often go undetected until a professional inspection. In a Stanwood case, a technician found all of these signs present across four different rooms of a single home, all stemming from the original installation rather than normal equipment wear.
How much does it cost to fix a mini split condensate leak?
Costs depend on how many zones are affected and the extent of the insulation or bracket work needed. In a Stanwood case, repairing condensate leaks and installation defects across four separate rooms, including re-anchoring a wall bracket, insulating multiple linesets, straightening a kinked line, and deep cleaning a coil and blower wheel, came to $2,481.97 before tax, or $2,707.83 total after a military discount was applied. Repairs of this kind generally don’t qualify for utility rebate programs, since those are reserved for new equipment installations.
Does homeowners insurance cover a mini split condensate leak?
Coverage varies significantly by policy and by whether the damage is classified as gradual, ongoing seepage versus a sudden, accidental event, with many policies excluding damage caused by gradual leaks that could have been prevented through proper maintenance. Homeowners concerned about coverage for a specific situation should review their policy language directly or contact their insurer, since HVAC contractors can identify and repair the source of a leak but can’t determine insurance coverage. In a Stanwood case, the condensate leak was caught and repaired during a routine maintenance visit before it caused visible water damage, avoiding the question of insurance coverage entirely.
What does deep cleaning a mini split coil and blower wheel involve?
A deep clean typically involves removing dirt, dust, and debris that accumulates on the evaporator coil and blower wheel over time, both of which can restrict airflow and reduce cooling efficiency if left unaddressed. This is a standard part of routine maintenance rather than an emergency repair, though buildup severity can vary depending on how long it’s been since the last service. In a Stanwood case, a living room unit’s coil and blower wheel were deep cleaned as part of a broader repair visit addressing several other installation-related issues throughout the home.
What happens during a yearly HVAC maintenance visit?
A yearly maintenance visit typically includes inspecting and cleaning key components like coils and blower wheels, checking refrigerant lines and insulation for gaps or damage, verifying that indoor units are securely mounted, and confirming the system is operating within normal parameters. The goal is to catch small issues before they become larger, more expensive problems. In a Stanwood case, a routine maintenance visit with no reported complaints uncovered four separate installation defects across a home’s ductless system, each invisible to the homeowner without that hands-on inspection.
Key Takeaways
- A brand-new HVAC system can still have serious installation defects, even when the equipment itself is functioning correctly, age and installation quality are separate issues entirely.
- Uninsulated refrigerant lines can cause condensation to form directly on the pipe and drain into places it was never meant to go, including inside wall cavities.
- Yearly maintenance on a ductless system can catch installation defects invisible during normal use, sometimes preventing mold and water damage before either one develops.
- A single ductless system with multiple indoor zones can have different installation problems in different rooms, making a room-by-room inspection important rather than assuming one issue represents the whole system.
- Repairing four separate installation defects across a multi-zone ductless system, including bracket re-anchoring and lineset insulation, cost $2,707.83 in a recent Stanwood case after a military discount.
- Repair work on existing HVAC equipment generally doesn’t qualify for utility rebate programs, which are reserved for new, efficiency-qualifying installations.
Meghan called for the most routine appointment a homeowner can schedule, and it turned into the discovery that mattered most. That’s really the case for maintenance in general. It’s rarely a big issue when it works the way it’s supposed to. Nobody notices the wall that never grew mold, or the bedroom that never had a water stain. They just get to keep living in a house that quietly stayed fine.
— Serge Nikolin, Co-Founder, Product Air Heating, Cooling and Electric
Marysville · Issaquah · Seattle · Western Washington
PLAN YOUR NEXT STEP
Need help with your home comfort?
Explore Product Air’s heat pumps services or contact the team.
Share this guide